

Vat photopolymerization uses photosensitive resin as the raw material. Under computer control, a UV laser selectively cures the resin layer by layer to form a solid object.
This process enables the efficient and fully automated production of prototypes with high surface quality, high dimensional accuracy, and complex geometries.
Vat Photopolymerization Process Workflow
1. Model Preparation
Resin printing requires careful model orientation and support design. Proper angling reduces suction forces and minimizes surface marks, while supports must ensure stability during printing and allow clean removal afterward.
2. Slicing Setup
Using dedicated resin slicers such as ChiTuBox or Lychee, key parameters are configured, including exposure time, lift speed and distance, and anti-aliasing settings. The software outputs a printer-specific file containing layer images and motion data.
3. Machine Setup
Before starting a print, complete the following checks and preparation steps:
- Check resin level: Make sure there is enough resin in the tank to complete the print.
- Mix the resin: If the resin has been sitting for a long time, stir or shake it for 1–2 minutes to ensure it is evenly mixed.
- Inspect the release film: Check for scratches, dents, or damage. Replace if necessary.
- Install the resin tank and build platform: Ensure both are securely mounted. The build platform must be properly leveled.
- Load the print file: Import the sliced file into the printer.
4. Printing
The build platform moves into position—either lowering into the resin (bottom-up systems) or positioning near the resin surface (top-down systems).
A light source (laser, DLP projector, or LCD mask) selectively exposes the first layer pattern, curing the liquid resin into a solid layer. This layer adheres firmly to the build platform and forms the foundation of the print.
Layer-by-Layer Curing and Platform Movement:
(1) Bottom-Up Systems (Most Common)
- After a layer is cured, the build platform lifts slightly (Z-axis movement), separating the cured layer from the release film.
- The platform pauses briefly to allow resin to flow back into place.
- The platform lowers to the next layer position (one layer height above the previous layer).
- The light source cures the next layer, bonding it to the previous one.
(2) Top-Down Systems
- After a layer is cured, the build platform moves downward by one layer height.
- A blade or roller recoats a fresh, even layer of resin over the surface.
- The light source cures the new layer from above.
- This cycle repeats until the part is fully formed. Depending on the machine design, the part may be built in an upright or inverted orientation.
- Environmental control: Maintains a stable ambient temperature and keeps the printer enclosure closed during operation.
- Monitoring: The process should be thoroughly monitored, including resin level and machine status, for the entire duration of the print.
5. Post-Processing
After the final layer is cured, the build platform will either raise (bottom-up systems) or lower (top-down systems). Users should wear protective gloves and safety goggles before removing the part, which is still covered with uncured resin and attached to the support structures. Allow excess resin to drain off while the part is still on the build platform, then carefully remove it from the platform.
Next, place the part—together with its supports—into a cleaning solvent such as isopropyl alcohol (IPA) to remove residual resin. It is recommended to remove supports while the resin is still in a partially cured state, followed by a second cleaning if needed.
Finally, transfer the part to a UV curing unit for post-curing to achieve the intended mechanical properties. Additional finishing steps, such as sanding or painting, can be performed as required.
SLA 3D Printing
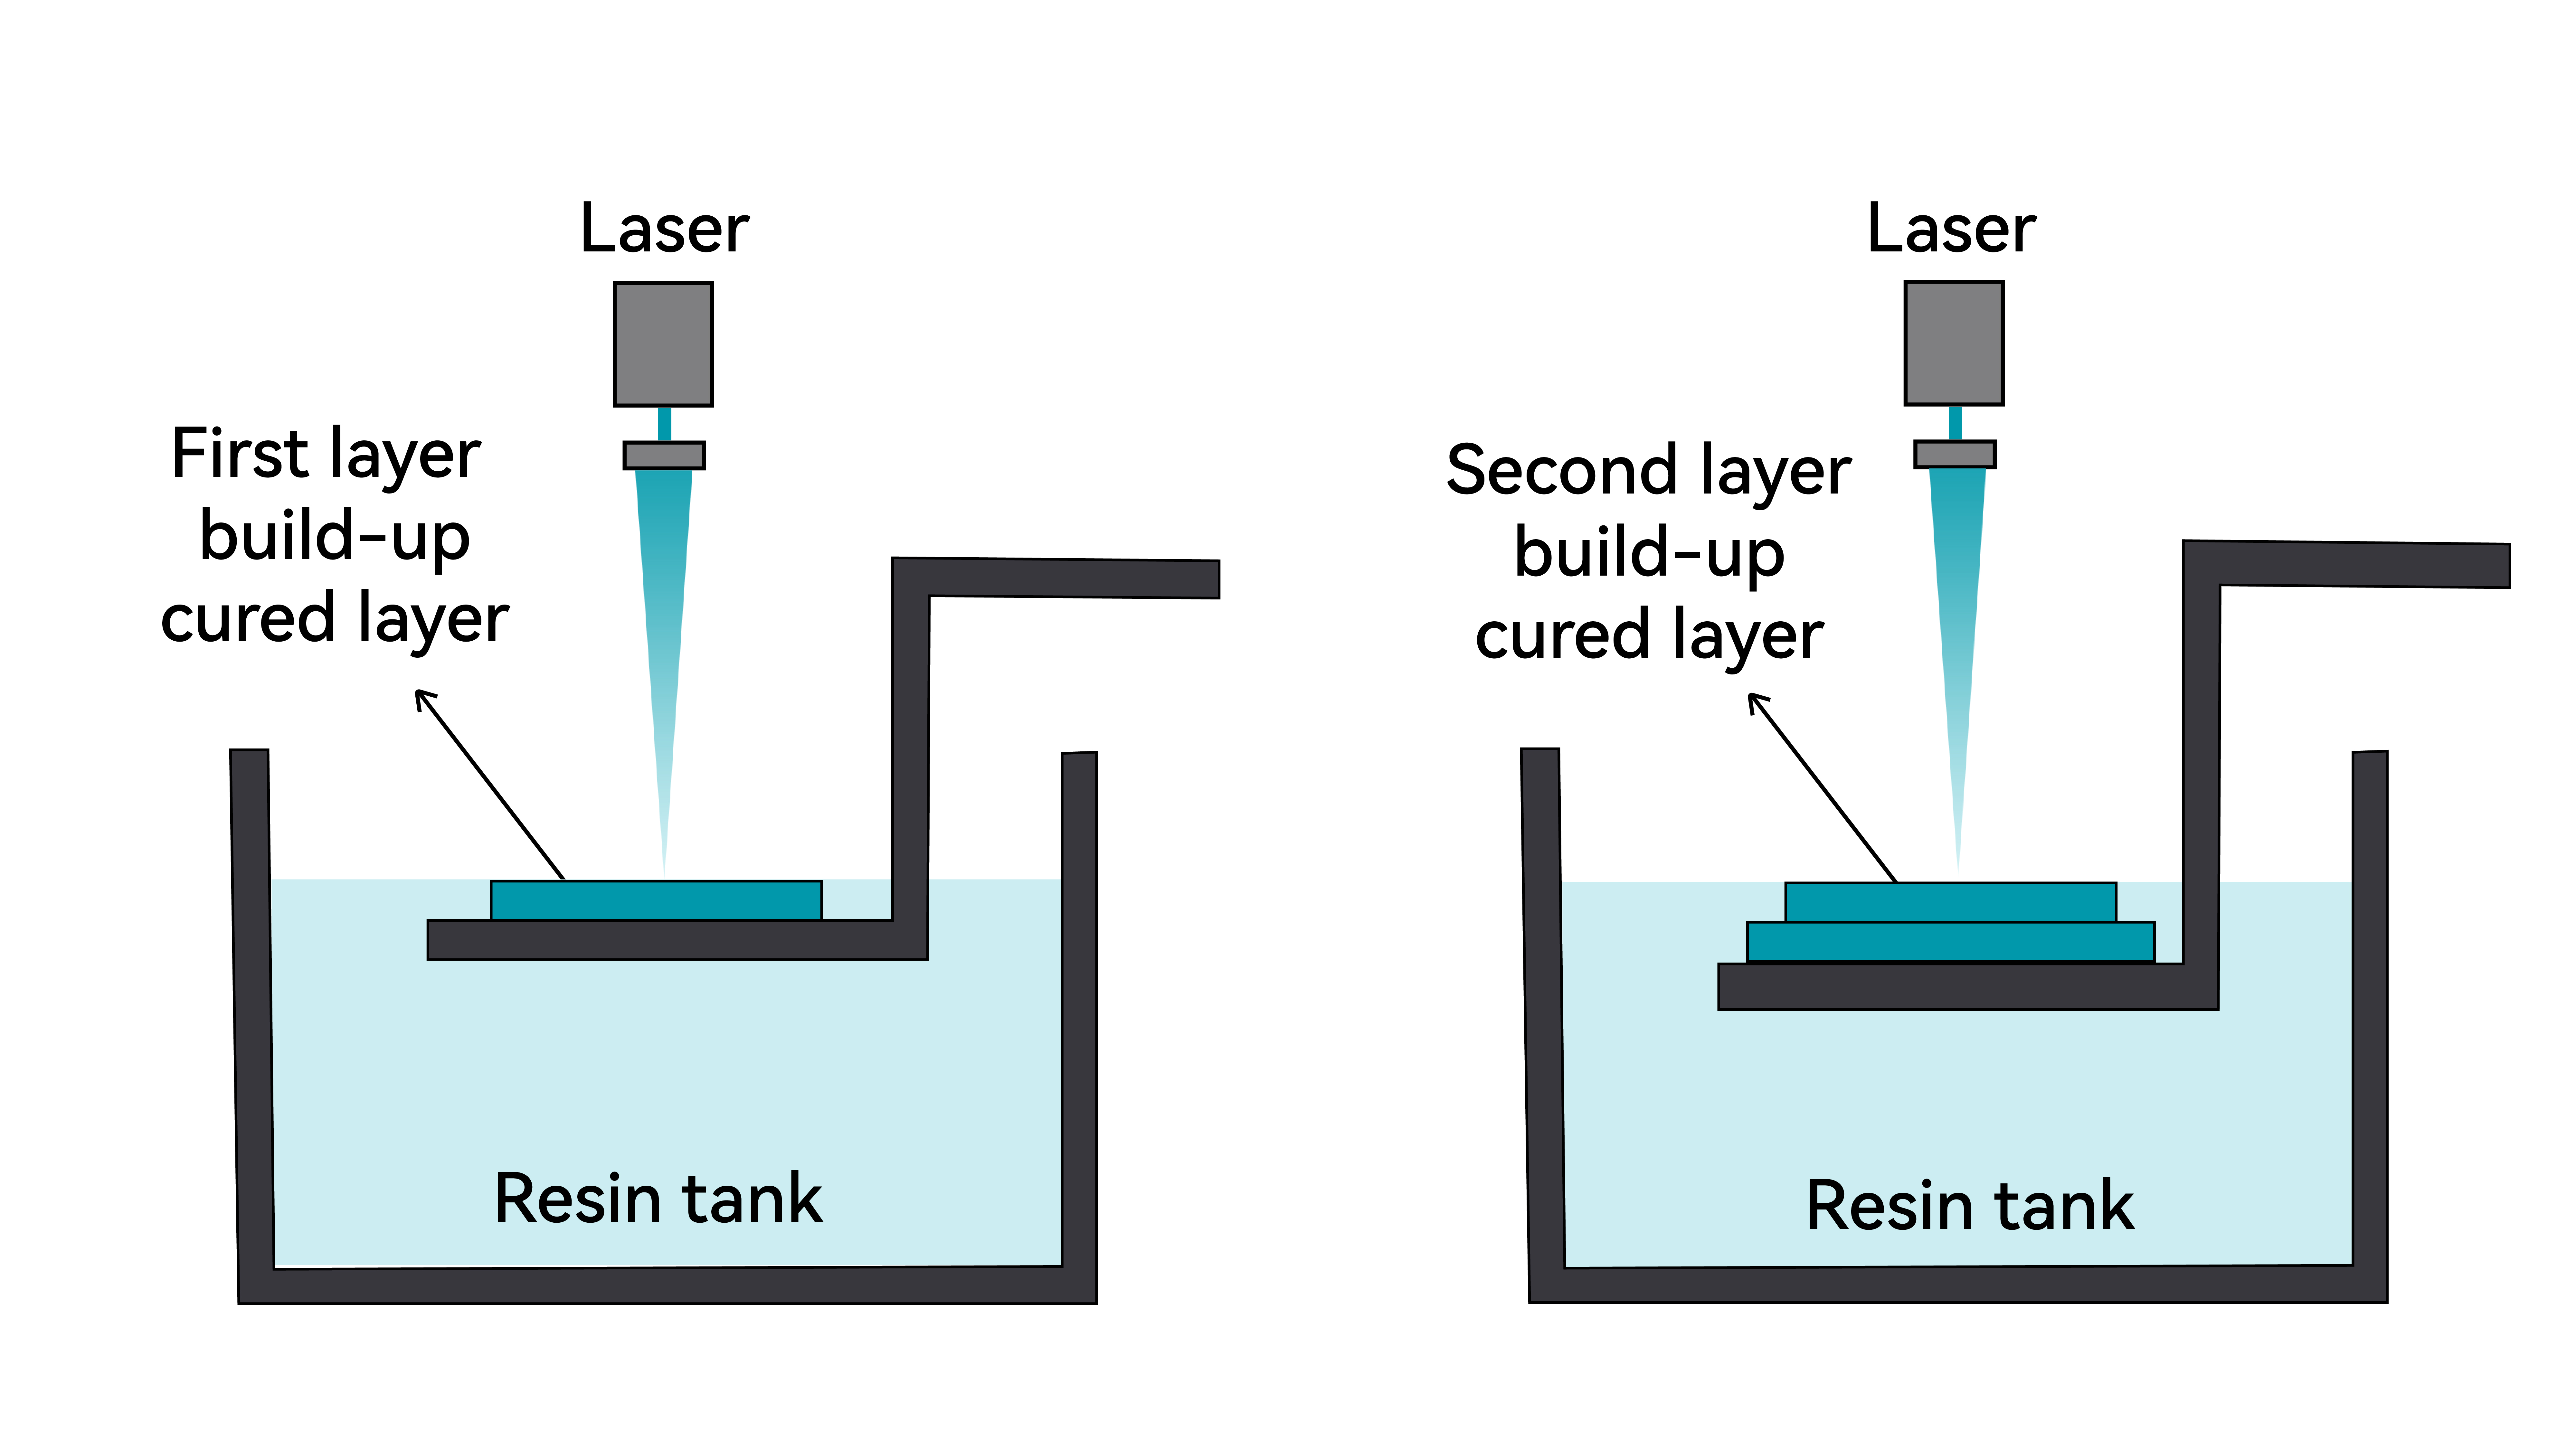
SLA (Stereolithography Apparatus) is a laser-based vat photopolymerization process. It uses a focused ultraviolet (UV) laser to scan and cure liquid photopolymer resin point by point.
Under computer control, the laser traces the cross-sectional geometry of each layer on the surface of the resin. The exposed areas rapidly solidify through photopolymerization. Once a layer is completed, the build platform moves by one layer height (up or down, depending on the machine design), allowing fresh resin to cover the previously cured layer. This process repeats layer by layer until the final 3D object is formed.
After printing, the part is removed, cleaned to eliminate uncured resin, and post-cured under UV light to achieve its final mechanical properties.
Key Characteristics of SLA
Advantages
1. Exceptional precision and fine detail, suitable for complex geometries
2. Excellent surface finish, with minimal visible layer lines
3. Wide material range, supporting various applications
Limitations
1. Slower print speed due to point-by-point laser scanning
2. Higher equipment cost
DLP 3D Printing
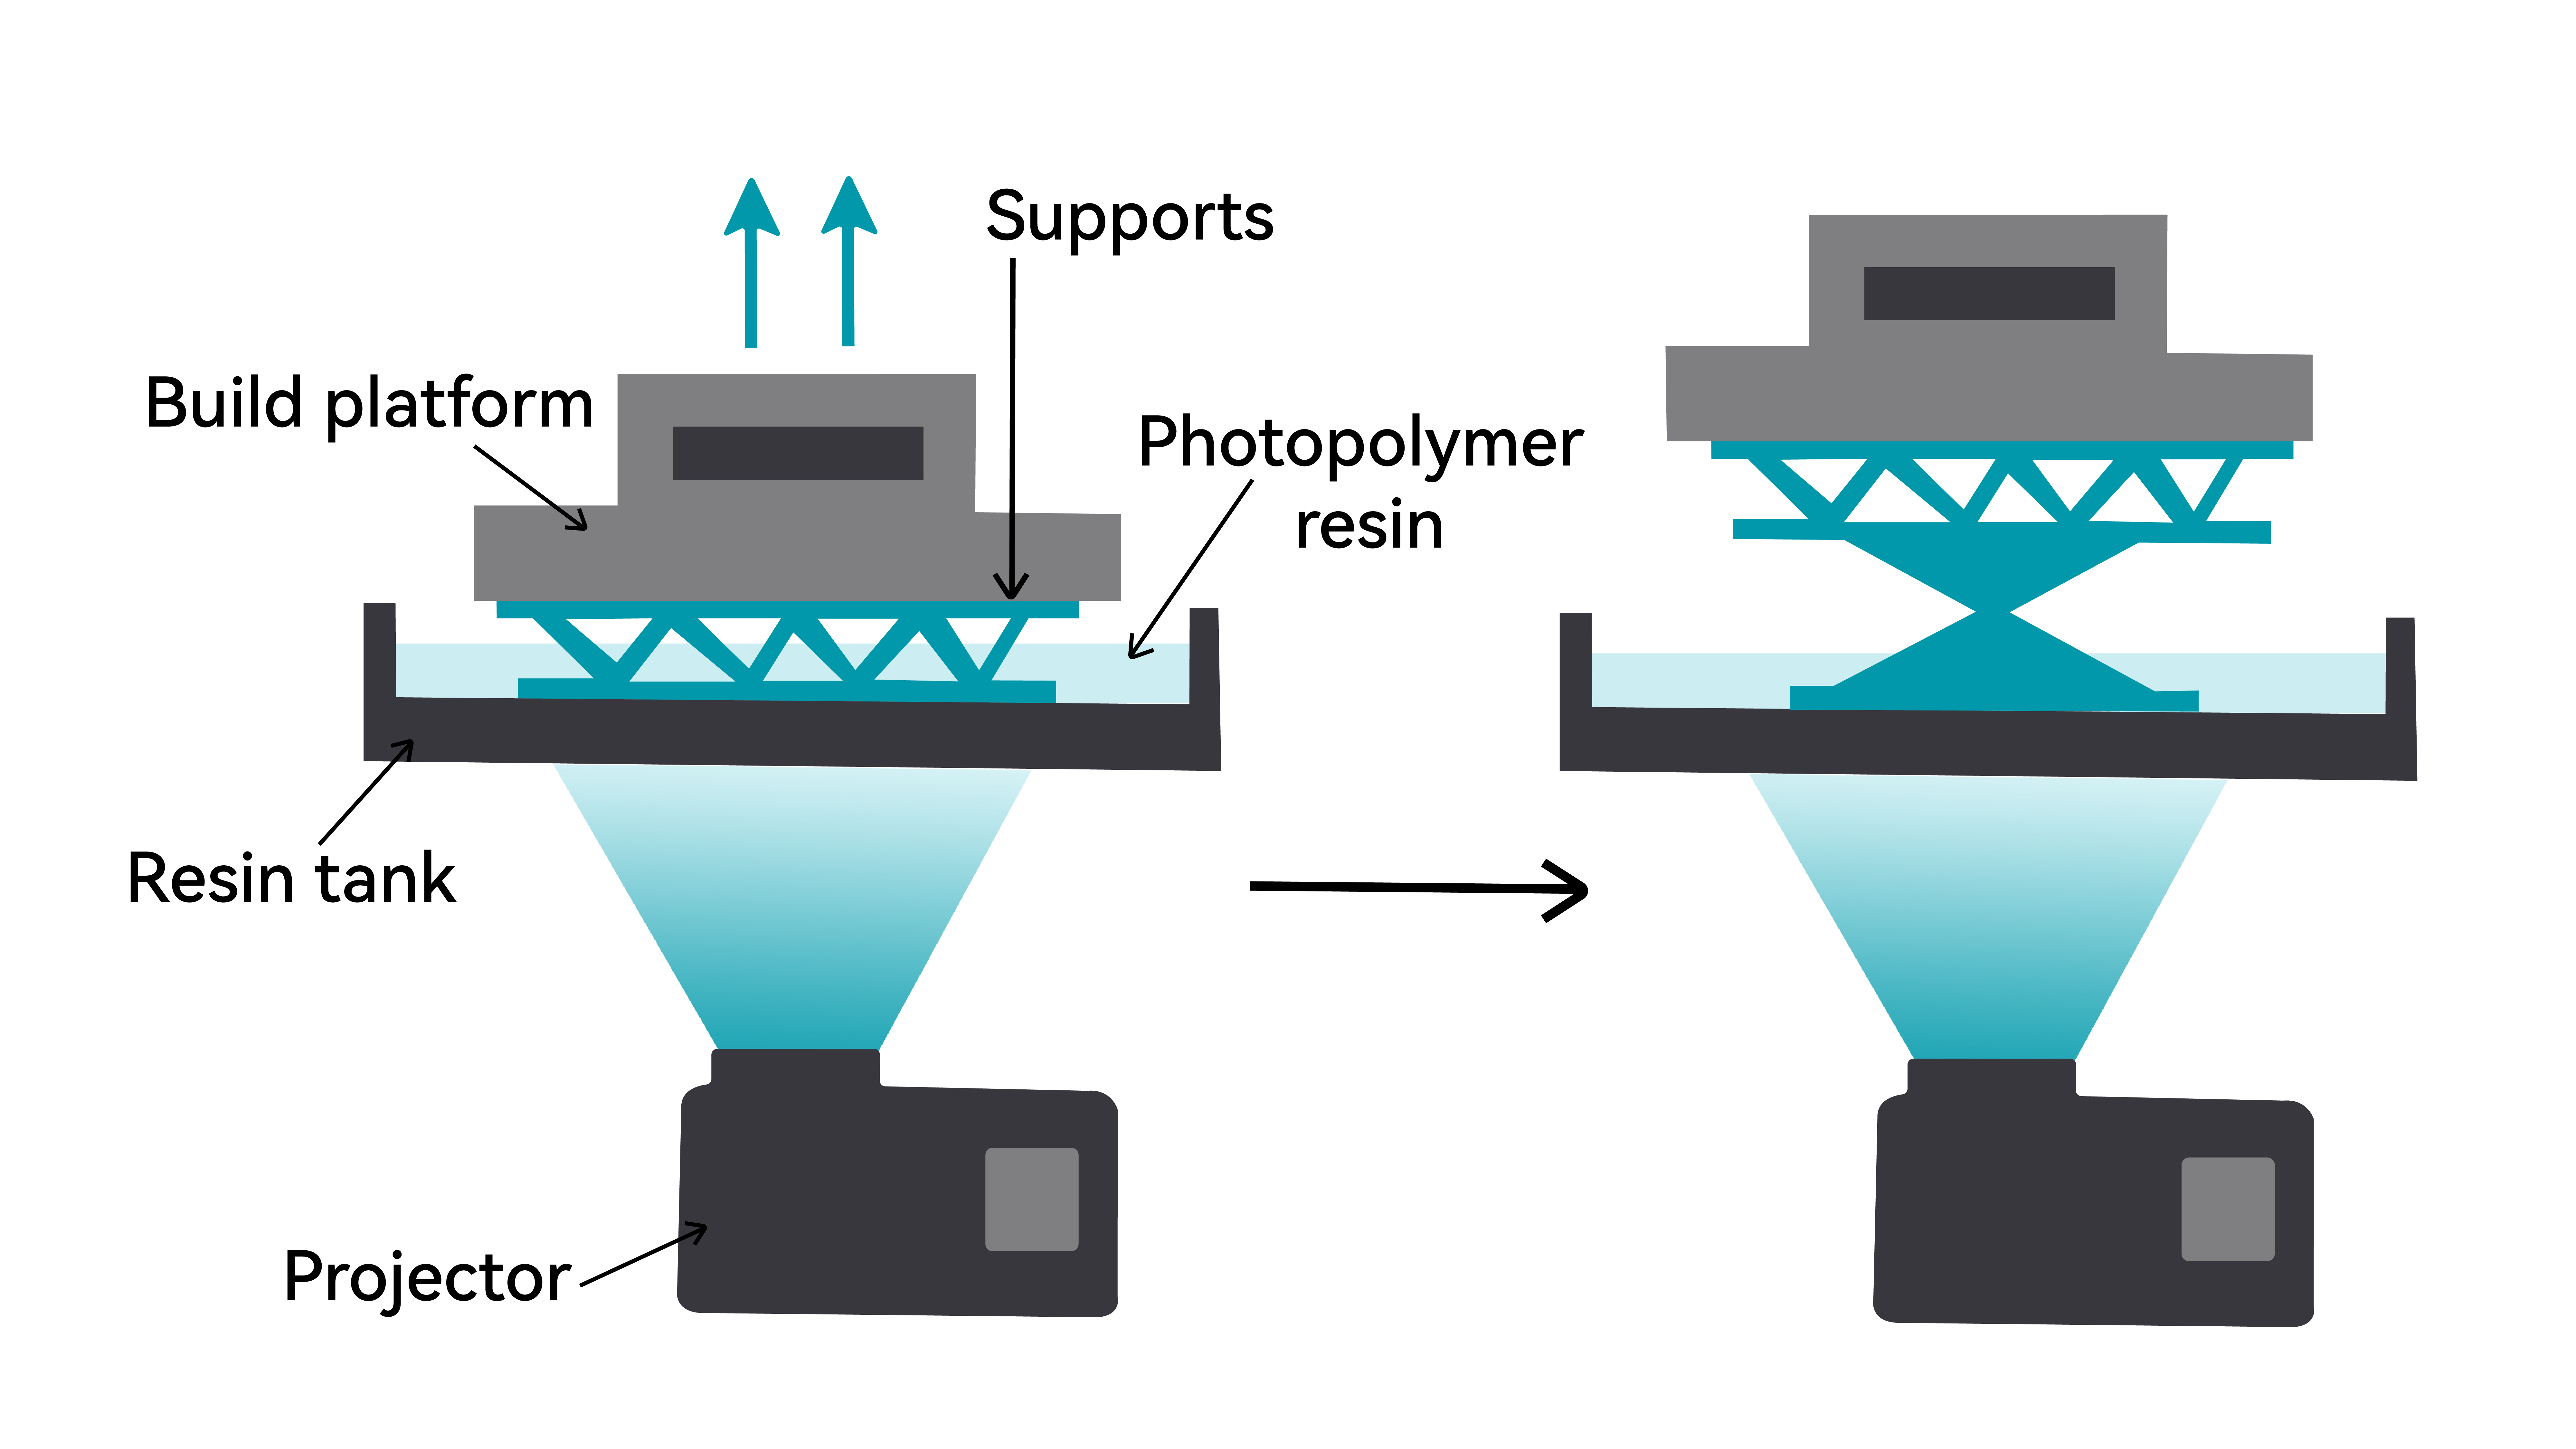
DLP (Digital Light Processing) is a vat photopolymerization process that cures an entire layer at once.
Unlike SLA, which scans point by point, DLP uses a digital projector to flash a complete cross-sectional image of each layer onto the resin surface. The illuminated areas cure simultaneously, while dark areas remain liquid.
Because each layer is exposed in a single step, print time per layer is constant and does not depend on the complexity of the geometry. As a result, DLP is typically faster than SLA, especially for parts with large or complex cross-sections.
The rest of the workflow—layering, platform movement, cleaning, and post-curing—is similar to SLA.
Key Characteristics of DLP
Advantages
1. High printing speed, as each layer is cured simultaneously. Consistent build time per layer, independent of XY complexity.
2. Good accuracy and detail reproduction
3. Durable light source (projector-based system)
Limitations:
Resolution depends on projection size: As the build area increases, pixel density decreases, which can reduce fine detail quality
LCD 3D Printing
What Is LCD 3D Printing?
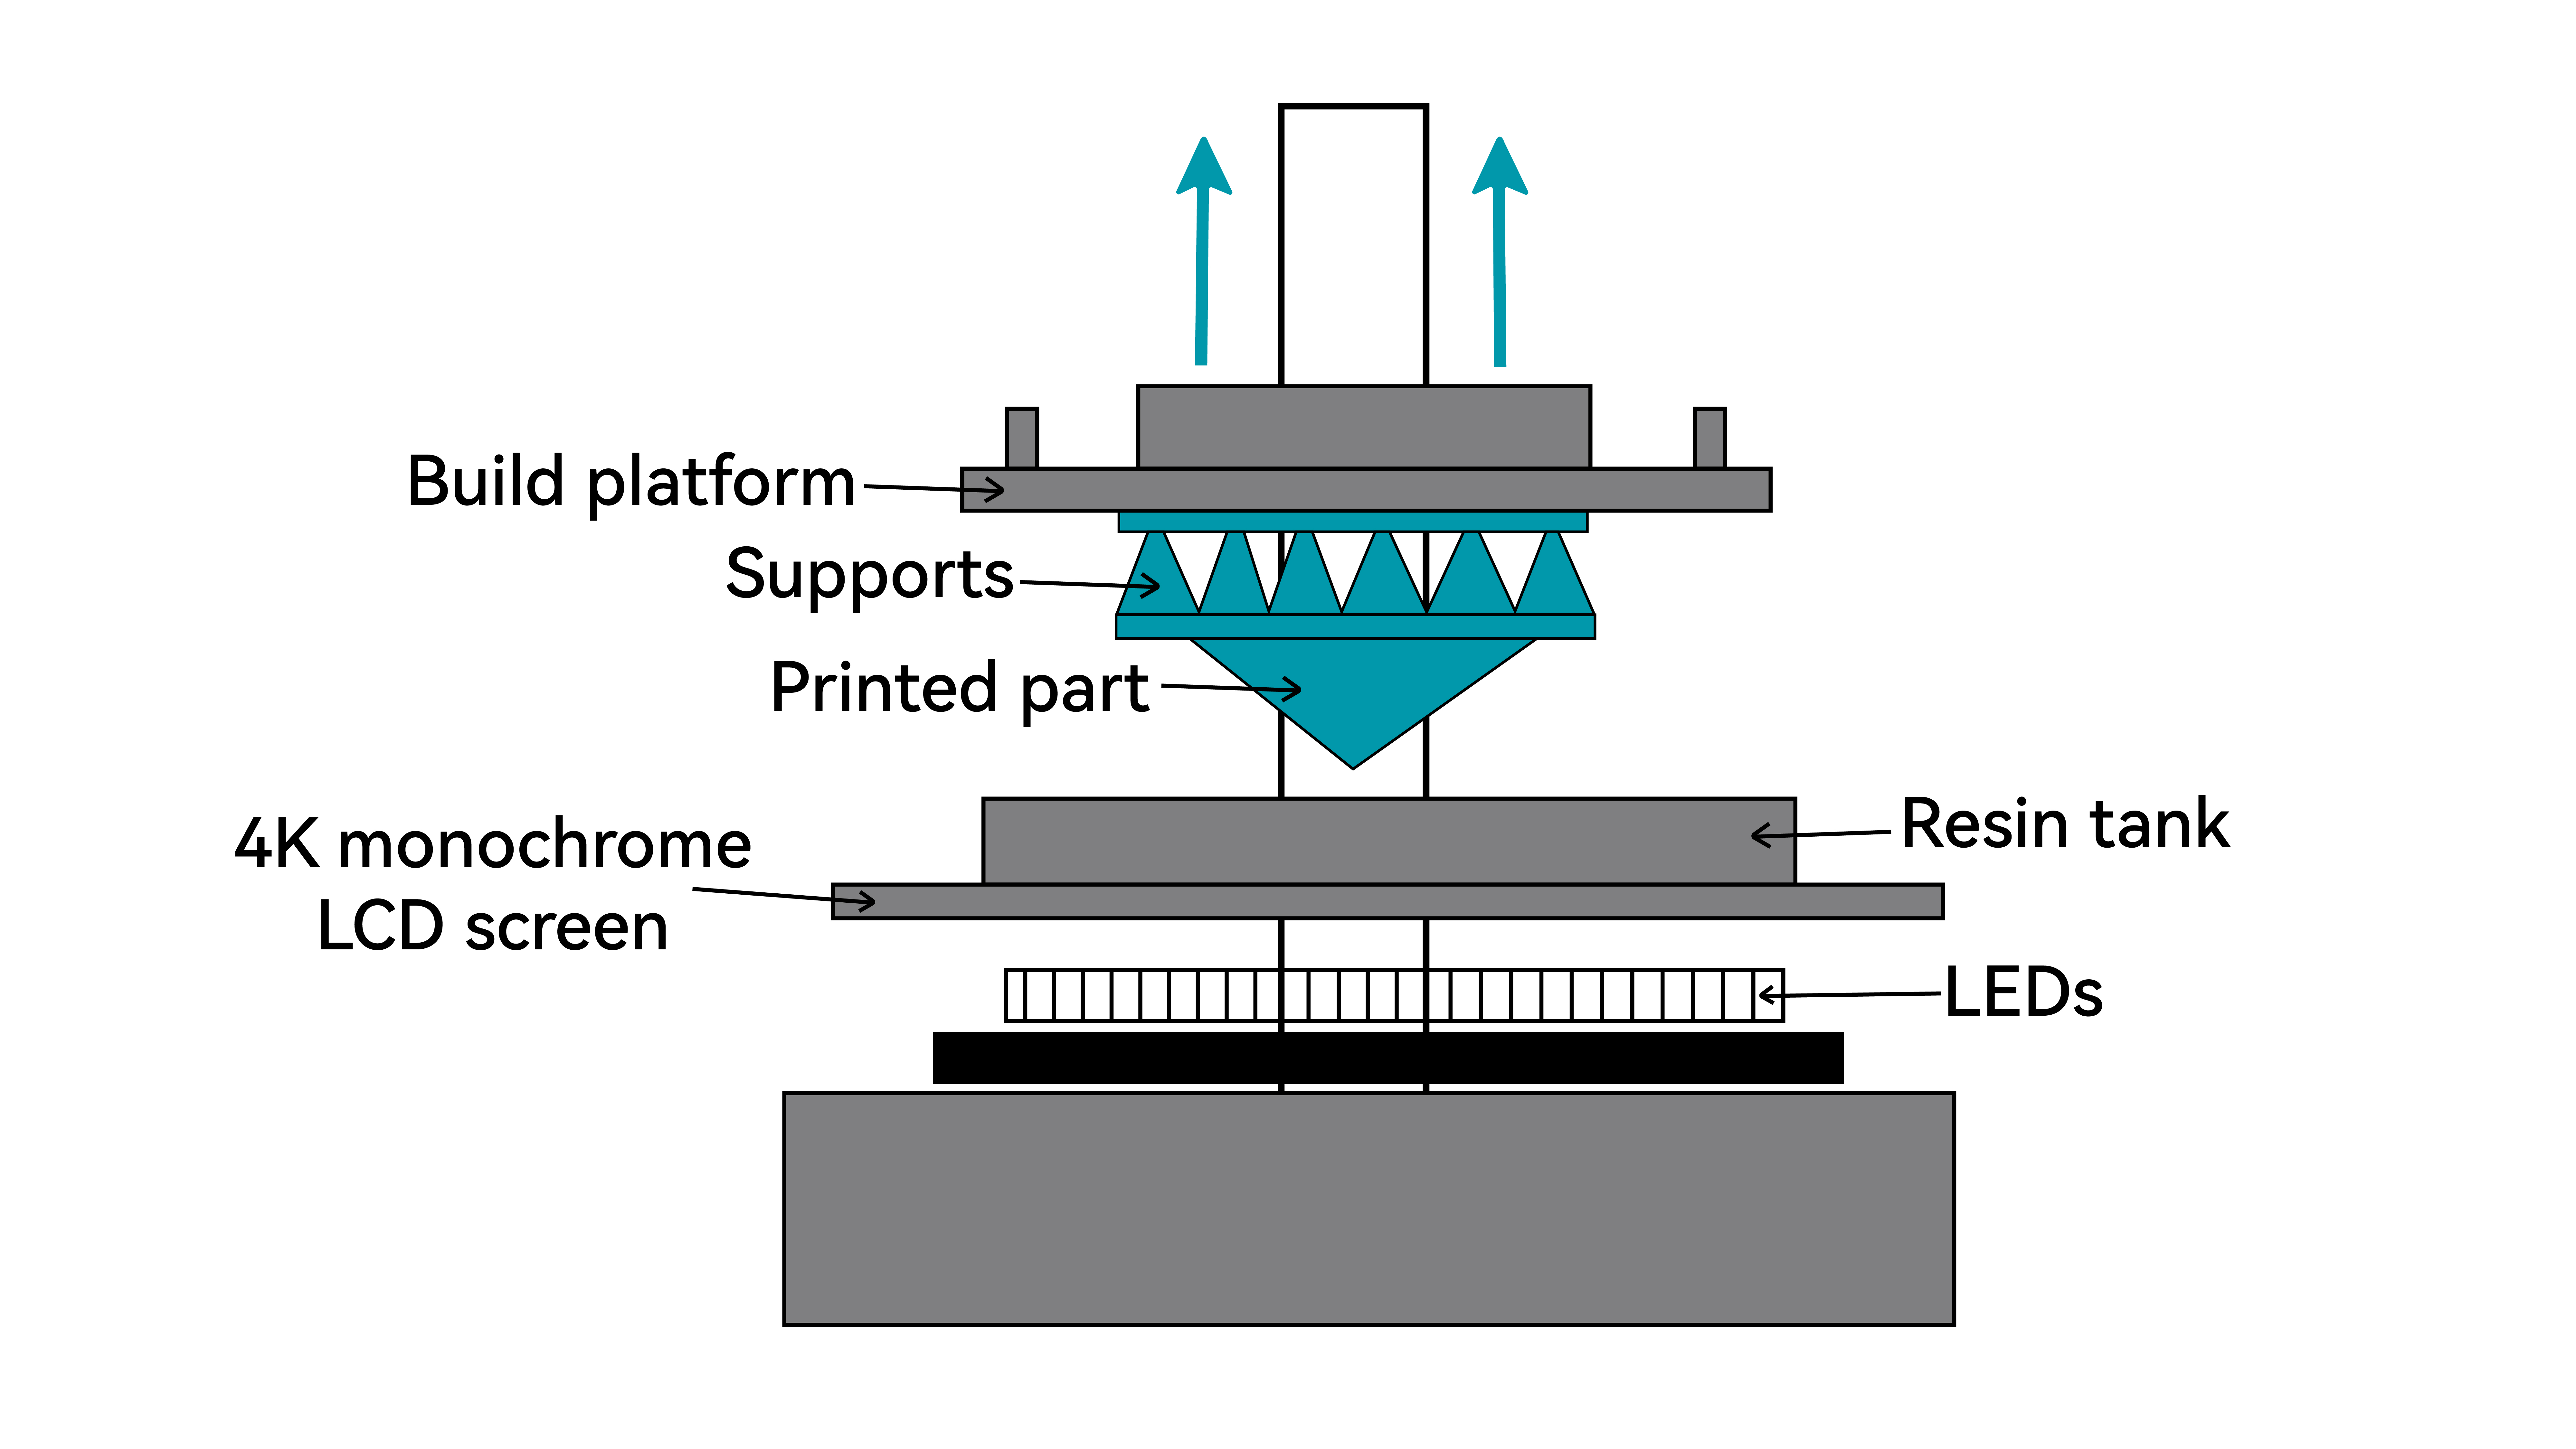
LCD 3D printing is a resin-based photopolymerization technology that uses a high-resolution liquid crystal display as a dynamic mask.
During printing, the LCD screen projects a sliced image of each layer of the 3D model. A UV LED array beneath the screen emits uniform ultraviolet light, which passes only through the transparent areas of the mask and cures the liquid photopolymer resin inside the vat in a single exposure. The exposed resin undergoes rapid polymerization and solidifies into a precise layer.
The build platform then lifts incrementally, repeating the process layer by layer, allowing the part to be formed directly from liquid resin with exceptional surface detail.
Key Characteristics of LCD Printing
Advantages
1. High cost-to-performance ratio
LCD technology delivers excellent resolution while keeping hardware costs relatively low, making professional-grade precision accessible to designers, educators, and hobbyists.
2. Fast layer curing
Each layer is exposed and cured simultaneously, meaning print time per layer remains constant regardless of model complexity.
3. Outstanding detail reproduction
Ideal for applications requiring fine features and smooth surfaces, such as jewelry patterns, dental models, precision components, and collectible figurines.
Limitations
1. Material handling requirements
Liquid resins can irritate skin and release fumes. Proper ventilation and protective equipment are essential.
2. Post-processing intensity
Printed parts must be washed, support structures removed, and UV post-cured. The process generates chemical waste and requires additional equipment.
3. Consumable components
LCD panels and release films are wear items that require periodic replacement and may affect long-term accuracy.
4. Mechanical brittleness
Standard resins are generally more brittle and less fatigue-resistant than engineering thermoplastics, and may yellow or degrade over time.